Screenshots are a daily staple for remote teams, content creators, customer support staff, students, and online community participants. They let you share UI examples, error messages, workflow guides, and conversation previews with a single click.
Every standard screenshot captures far more private data than most users realize. Phone numbers, full names, email addresses, physical addresses, account IDs, payment details, and personal chat logs sit unprotected in every captured frame. Sharing unedited screenshots opens you up to data leaks, privacy violations, and unnecessary security risks.
Basic built-in editors offer weak, unreliable marking tools. Solid color blocks look unprofessional, and low-quality blur filters often let text peek through after compression. Manual pixelation work takes extra time and rarely delivers consistent privacy protection across multiple screenshots.
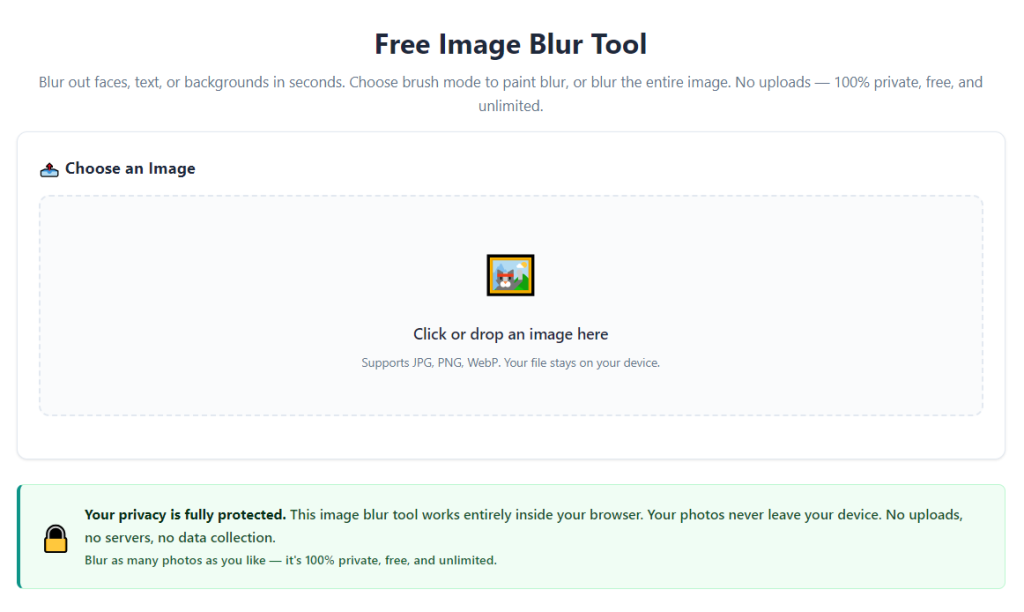
A purpose-built best image blur tool for sensitive screenshot redaction solves all these privacy and editing pain points. It delivers adjustable, permanent blurring layers designed exclusively for covering confidential text and visuals within screen captures, far more precise than generic photo editing software.
This fully downloadable guide breaks down the risks of unredacted screenshots, limitations of basic editors, core advantages of dedicated blur tools, non-negotiable professional features, real-world use cases, and a step-by-step workflow to redact sensitive screen captures safely every time you share content online.
Why Basic Editing Tools Fail Sensitive Screenshot Redaction
Most users rely on default system editors, simple markup apps, or universal photo software to cover private screenshot content. These generic options carry consistent flaws that compromise privacy and professional presentation.
Weak, reversible obscuring effects
Default marker shapes and low-strength blur filters do not fully obscure small text. When screenshots get compressed for social feeds, messaging apps, or file sharing platforms, faint readable outlines of hidden data reappear. Generic editors lack heavy-duty, permanent blur layers built for text redaction.
No precision selection controls
Basic markup tools only offer freehand brush strokes or rigid square boxes. Irregular sensitive sections—partial usernames, split payment rows, scattered contact text—cannot be neatly isolated without covering unrelated usable content on the screenshot.
One-size-fits-all blur strength
Standard editors lock blur intensity to a single preset. You cannot apply light blur to minor personal labels or heavy, full obscuring to highly confidential financial or identification data in the same screenshot.
Cumbersome multi-file processing
If you need to redact a batch of screenshots for a report or team update, basic editors require separate uploads and edits for every capture. There is no streamlined workflow to apply identical privacy blurring rules across dozens of screen images.
Unpolished final output
Solid black rectangles and uneven hand-drawn blur strokes make shared screenshots look messy and unorganized for business, client, or educational use. Generic editing tools lack subtle, uniform blur effects that keep visuals clean while protecting private details.
Key Benefits of the Best Image Blur Tool for Sensitive Screenshot Redaction
Integrating the best image blur tool for sensitive screenshot redaction into your daily sharing workflow eliminates privacy risks while streamlining screenshot editing for personal and professional use.
Tiered blur intensity for layered privacy protection
Top dedicated tools include adjustable blur strength sliders. Apply mild soft blur for low-risk personal metadata, medium blur for usernames and partial contact info, and maximum heavy pixelation for payment numbers, ID snippets, and full physical addresses on screenshots.
Precise shape selection for targeted redaction
Users access rectangular, circular, freehand lasso, and polygon selection modes. You can trace exactly around sensitive text blocks without covering relevant instructional UI, chart data, or conversation context you want viewers to reference.
Permanent, compression-resistant blur layers
Blur edits embed directly into screenshot pixel data, rather than sitting as removable markup overlays. Even after compression for social media, forums, or document attachments, redacted text stays fully unreadable to anyone viewing the shared file.
Batch screenshot redaction support
Process entire folders of captured screens in a single session. Save custom blur preset templates to apply identical privacy standards across dozens of screenshots for client reports, internal team briefings, or educational tutorial packs.
Clean, professional visual output
Uniform, smooth blur gradients replace clunky solid color blocks. Redacted screenshots maintain a polished, cohesive layout suitable for business presentations, public tutorial posts, customer support guides, and student shared coursework.
Cross-format screenshot compatibility
The tool accepts every standard capture file type, including PNG, JPG, long scroll screenshots, window captures, and full-screen snapshots. No conversion steps are required before adding privacy blur layers to any screen capture file.
Fast, lightweight editing performance
Unlike bulky all-in-one photo suites loaded with unnecessary filters and retouching features, this specialized blur tool launches instantly. Redacting single or bulk screenshots takes seconds instead of waiting for heavy software to load.
Must-Have Features of a Premium Best Image Blur Tool for Sensitive Screenshot Redaction
Not all image blur utilities support professional screenshot privacy redaction. The true best image blur tool for sensitive screenshot redaction includes these screenshot-focused, privacy-first functional features.
Multi-shape selective masking tools
Rectangular, elliptical, freehand lasso, and custom polygon selectors let users outline any irregular sensitive region on screenshots. Fine pixel adjustment modes ensure zero accidental coverage of non-confidential content.
Customizable blur strength gradient slider
A continuous intensity control separates light soft blur, medium privacy blur, and maximum heavy pixelation. Save custom strength presets to quickly toggle between redaction levels for different categories of private data.
Non-destructive editable blur layers
All blur masks sit as separate adjustable layers before final export. You can resize, move, delete, or re-draw redaction zones without reuploading the original screenshot capture file.
Bulk screenshot batch processing module
Import multiple screenshot files at once, apply matching blur templates, and export all redacted images in one single batch export operation. Ideal for content creators, support teams, and corporate documentation workflows.
Original file preservation option
Choose to export a new redacted copy of your screenshot while keeping the unedited raw capture stored separately. This prevents permanent loss of the unblurred source file for internal reference.
High-resolution export settings
Export redacted screenshots at full original pixel resolution or compress for lightweight sharing. Adjust file quality without weakening the embedded blur redaction layers hiding sensitive text.
Minimal, distraction-free interface
The tool’s layout prioritizes screenshot canvas, selection tools, and blur controls. No excess photo filters, templates, or graphic editing clutter slows down fast privacy redaction tasks.
Undo/redo multi-step edit history
Recover misplaced blur masks or incorrect selection shapes instantly with unlimited step history. Fix redaction errors without restarting the entire screenshot editing process from scratch.
Real-World Use Cases for Sensitive Screenshot Blur Redaction Tools
A versatile best image blur tool for sensitive screenshot redaction fits every personal, educational, corporate, and content creation scenario that requires sharing captured screen content with hidden private data.
Remote team internal documentation
Distribute workflow screenshots, software error captures, and dashboard previews to coworkers. Blur employee personal IDs, client contact information, and internal account credentials before sharing team folders.
Customer support public troubleshooting guides
Publish UI screenshots for product help articles, forum threads, and social media tutorials. Redact customer names, phone numbers, billing amounts, and private chat snippets to comply with data privacy guidelines.
Content creator social media and tutorial content
Share app walkthroughs, website previews, and software screen captures across platforms. Blur personal account usernames, email addresses, payment popups, and private message threads to avoid follower data exposure.
Student and educator educational material sharing
Exchange assignment screenshots, software tutorial captures, and digital worksheet previews in class groups. Redact student full names, personal login details, and private assignment feedback before public distribution.
Small business client proposal previews
Send dashboard mockups, order system screenshots, and quote previews to prospective customers. Blur existing client payment records, internal profit metrics, and proprietary contact databases in shared screen captures.
Online community forum and marketplace posts
Post app, website, and service screenshots in public discussion spaces. Hide personal profile identifiers, shipping addresses, and payment popups to prevent unwanted data scraping by third-party users.
Compliance-focused corporate record sharing
Create archived documentation screenshots for audit, compliance, and legal teams. Apply permanent heavy blur to all personally identifiable information to meet regional data protection regulations.
Step-by-Step Complete Workflow: Use the Best Image Blur Tool for Sensitive Screenshot Redaction
Follow this privacy-focused, repeatable editing process to fully redact confidential data from any screenshot with professional, secure blur masking.
Step 1: Capture and organize your raw screenshot files
Take all required screen captures using your device’s native screenshot function. Save every capture into a dedicated folder to simplify bulk upload later. Flag screenshots containing high-risk confidential data like payment info or full identification for maximum blur treatment.
Step 2: Launch the dedicated screenshot blur redaction tool
Open the lightweight specialized blur utility directly from your device menu or browser. The tool loads instantly with no unnecessary graphic editing add-ons displayed on the main workspace.
Step 3: Import single or multiple screenshot files
Select the upload function to pull individual screenshots or entire folders of captures into the editor’s canvas panel. The tool supports simultaneous multi-file loading for batch redaction workflows. Confirm all screen captures load with full original resolution intact.
Step 4: Select a matching shape masking tool for your sensitive zones
Review each screenshot to identify all confidential text and visuals. Pick the appropriate selection shape: rectangles for block text rows, freehand lasso for scattered fragmented data, and polygons for irregular UI panels holding private information.
Step 5: Adjust blur intensity to match your privacy risk level
Open the blur strength slider control. Set mild soft blur for low-risk metadata such as partial display names; select medium blur for email addresses and usernames; drag the slider to maximum heavy pixelation for payment numbers, full addresses, and identification snippets.
Step 6: Draw precise blur masks over every sensitive section
Trace clean borders around all private content on the screenshot. Zoom in on small text fields using the built-in magnifier tool to avoid partial unblurred edges where readable text could remain visible. Create separate blur layers for distinct confidential zones to enable later adjustments.
Step 7: Review all redaction layers for unobscured data gaps
Pan across the full screenshot and zoom into every masked blur region. Double-check corners of selection boxes, thin text rows, and overlapping UI elements for tiny unblurred gaps that could expose private information after compression. Add extra small blur masks to cover any missed fragments of sensitive text.
Step 8: Tweak blur layers with undo/redo edit history if needed
If any mask covers relevant usable content or fails to fully obscure private data, use the undo tool to erase the flawed selection. Re-draw precise masking shapes and re-adjust blur intensity without reuploading the base screenshot file.
Step 9: Save custom blur preset templates (for batch workflows)
If you regularly redact identical categories of sensitive data, save your selected shape tool and blur strength settings as a reusable template. Load this preset automatically when processing batches of similar screenshots for consistent privacy standards.
Step 10: Export redacted screenshots with separate original file storage
Select your preferred export resolution and file format (PNG recommended for sharp permanent blur layers). Enable the “save original unblurred copy” toggle to retain the raw unedited screenshot for internal offline reference. Download all finished redacted files to your designated output folder for sharing or archiving.
Common Costly Mistakes to Avoid When Redacting Screenshots With Blur Tools
Even with access to the best image blur tool for sensitive screenshot redaction, these frequent editing errors create privacy leaks or unprofessional shared visuals.
Using insufficient low-strength blur for financial and ID data
Light soft blur masks over payment digits, full legal names, and physical addresses leave recoverable text outlines after file compression. Always apply maximum heavy pixelation to high-risk personally identifiable information.
Rushing selection shapes without zooming in on small text
Drawing blur masks at full screenshot zoom creates uneven, incomplete borders around tiny text fields. Always magnify confidential sections to trace tight, full coverage around every character of sensitive content.
Deleting the original unblurred screenshot file
If you overwrite the raw capture with your redacted export, you lose the unmodified source for internal audits, record checks, or follow-up edits. Always store separate unedited and blurred copies of every screenshot.
Applying identical blur strength to every sensitive zone
One-size-fits-all medium blur wastes visual clarity on low-risk minor labels while failing to fully obscure high-risk financial data. Tier blur intensity based on the privacy risk level of each masked section.
Skipping post-edit gap review before exporting
Tiny unblurred pixel gaps along mask edges often go unnoticed during initial drawing. A final zoomed scan of every redacted zone eliminates accidental data exposure in shared screenshots.
Over-blurring non-confidential instructional content
Oversized blur masks that cover relevant tutorial UI, chart data, or reference text reduce the screenshot’s usefulness for viewers. Only draw selection borders directly around strictly private information.
Relying on freehand brush strokes for block text rows
Freehand blur brushes create uneven, patchy masking over neat rows of contact or billing text. Use rectangular selection tools for uniform, clean redaction over block-format sensitive data.
Pro Expert Tips to Maximize Privacy & Clean Output From Your Blur Redaction Tool
Use these actionable professional strategies to get consistent, secure, polished results every time you work with the best image blur tool for sensitive screenshot redaction.
- Bookmark or pin the blur tool to your main device taskbar for one-click access before every screenshot share session.
- Create three saved blur presets labeled Low Risk, Medium Risk, High Risk to standardize redaction across all your screenshot batches.
- Always export redacted screenshots as PNG files; lossy JPG compression weakens embedded blur layers more noticeably over time.
- Process all screenshots for a single report, tutorial, or team update in one batch session to maintain matching visual blur consistency.
- Use polygon selection tools for complex multi-line UI panels with scattered private data to avoid overlapping messy blur strokes.
- Build a folder system separating raw unedited screenshots, partially edited drafts, and final redacted share-ready exports for organized record keeping.
- Test one exported redacted screenshot by uploading it to your typical sharing platform before distributing the full batch to confirm blur holds after compression.
- Train all team members on your saved blur preset standards if multiple staff handle screenshot redaction for business documentation.
Final Thoughts
Screenshot sharing is unavoidable for nearly every online worker, student, creator, and business owner—but accidental private data leaks do not have to be. Generic editors and manual markup methods leave critical gaps in privacy protection while producing unpolished shared visuals.
The dedicated best image blur tool for sensitive screenshot redaction resolves both security and aesthetic pain points in one streamlined utility. Adjustable tiered blur strength, precise multi-shape masking, permanent compression-resistant redaction layers, and batch processing deliver reliable privacy without sacrificing screenshot readability for your audience.
Whether you create tutorial content for public platforms, compile internal corporate documentation, share educational coursework, or send client-facing previews, this specialized blur tool establishes consistent data protection standards for every screen capture you distribute online.
By following the step-by-step redaction workflow and avoiding common privacy-leak editing mistakes outlined in this downloadable guide, you can confidently share polished, fully redacted screenshots without exposing confidential personal, financial, or business data to unintended viewers.
After learning the operation method, click the link below to enter the tool page for immediate use.